

L O G I S T I C S : PATAGONIA KAYAK
T H E R O U T E
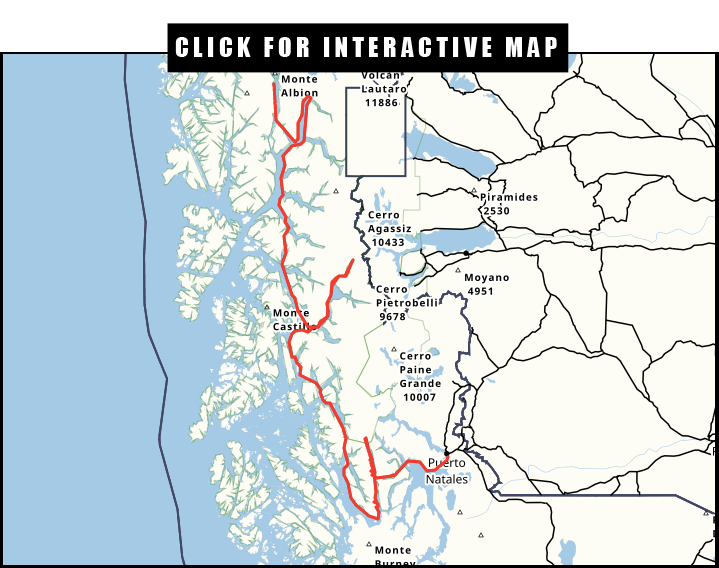
START: Puerto Eden
END: Puerto Natales
DESCRIPTIVE:
To access the starting point a we used the Navimag ferry service which runs between Puerto Natales and Puerto Montt via Puerto Eden. If you are planning a more northern expedition, there is also now a Puerto Natales-Tortel ferry service.
Once leaving the ferry you are on our own until the end.
There is a local hostel in Puerto Eden, however at the time of our arrival this was not open, nor is there anywhere to camp. We were kindly invited into the home of a local fisherman (Vilo) whom we offered to cut wood for in exchange for a bed until our naval permission was granted.
Our route followed through the fjord systems with the aim of achieving three northern detours to PioXI glacier, Peel Fjord and the Canal De Los Montanes. It is hugely advisable to travel from north to south as the strong prevailing wind is almost always from the north or north west.
To add an element of additional adventure and avoid some of the more exposed stretches of coast we opted to add in three portages. These were challenging, with dense vegetation and considerable elevation to navigate in places.
Our journey lasted a total of 32 days to complete. Of which 4 were spent stormbound, three ashore while portaging and a further two simply exploring around memorable camps.
Campsites were on the whole challenging to find, the vegetation which is remarkably dense stretches right to the seas edge. Do not be fooled by the lovely looking grass ‘lawns’ on many of the beaches, the grass is inter-tidal and will be flooded.
Our entire route plan was based on a conservative estimate of 25km per day- which less than our real final average of 38km per day allowed leeway for severe storms necessitating long periods ashore.
B E F O R E Y O U G O
Before considering an expedition in the west fjords, it is worth investigating what is already commercially available through the many guided outfitters that exist in Patagonia already. These offer some genuinely remote, wild journeys and bypass your need to worry regarding naval permissions, park entries, gear and planning. There are many kayaking companies that I would recommend, the following being a great place to start:
The local Hostels at Erratic Rock also have a wealth of knowledge an experience, not to mention a super atmosphere to chill out and stay.
If you are planning on organising your own trip then follow on below…
L E G A L I T I E S
This can be broken into 4 parts.
1. All Boats must have a certificate of cleaning- this is crucial to prevent spread of invasive DIYMO algae and having an increasing weight of importance in kayak inspections.
2. Pay CONAF park entry fees. For Bernado O’Higgins national park the prices in 2016 were about 5000 chilean pesos- about £5GBP. A very reasonable price for the continuation of 3,525,901 ha (8,712,691 acres) national park which even if increased since then is worth paying.
3. National permission for expedition. This is a simple process, mostly to confirm your intentions and also that you have insurance. You will need this before naval inspection. This can be done here: DIFROL.
4. Naval Permission.
Before ANY water based expedition or journey in Patagonia, it is a legal requirement to pass a naval inspection. From experience this can take time to arrange and process. The reason for this is largely due to the Navy being responsible for the policing and emergency rescue service throughout the fjords, this is a free service which they take very, very seriously.
To pass the naval inspection requires a detailed overview of your kit list, a review of each team members experience, proof of emergency insurance (from personal experience American Alpine Club Membership is widely recognised and preferenced) and a large degree of additional paperwork. You will need to leave them passport numbers for each team member, your emergency contact numbers, and a satellite phone number which you must be available on at a pre-arranged time each day. Chile is a Spanish speaking country so this will be done in Spanish. If you, like I are poor at Spanish then be as patient and understanding as they are or find a friend to interpret.
N A V A L P E R M I S S I O N
Naval permission must be acquired before the start of your journey and can be done by contacting the captains of Punta Arenas, Puero Eden or Puerto Natales (or nearest relevant port authority if elsewhere in Chile.
Once a meeting is agreed you will be required to pass the inspection: This follows a standard procedure based on national shipping protocol- some of this as you will find out is not applicable to kayaks (life-rafts etc).
I cannot guarantee the requirements will be the same today as they were when I did my last expedition in 2016, this process is constantly changing, and thankfully for us paddlers the navy is becoming more aware and understanding of the limitations and advantages of kayaks and less in the mindset of seeing them as being simple ‘tiny boats.’
The following is a translation of the final official form which we were signed off on. This is the format you are likely to expect, all sections must be read and passed.
- Navigation Plan: A day by day description of your route based on camp co-ordinates or local geographical names, your time each day on the water and distance paddled. Obviously some aspects of this changes during the trip due to conditions and the unforeseen, when this happens you must contact them via sat-phone.
- Name – Passport Number – Nationality
- Statement forbidding unregulated sale or transport of bivalve shellfish.
- Statement highlighting severe risk of illness or death by eating bivalve shellfish due to hard to detect red tide algal blooms.
- Statement highlight prohibition of lighting fires, and rubbish which in our translation recommended burying waste- Don’t do that! Take it out with you instead, this is one of the worlds last pristine wilderness areas. I made a point of also removing the very seldom pieces of trash we found en route also.
- Agreement that navigation must only be taken in daylight hours.
- Agreement that if route changed the navy must be informed.
- Gear List: This is clearly based on a large ship, not kayaks- but still enforced with exception to a life-raft.
- – Satellite Phone (Some now accept Delorme, two way communicators).
- – A personal floatation device – Buoyancy aid
- – Emergency flashing light visible to 3km
- – Compass and map case and GPS
- – Maps and Charts for navigation (Paper copy) + naval permissions paperwork
- – 1x Hand operated Flare (Parachute)
- – 1x Hand operated Flare (Smoke)
- – Signal Mirror **we did not have one of these.
- – Emergency life boat **This obviously does not apply here.
- – Waterproof flashlight & Batteries
- – Knife – available from paddling position
- – First aid kit and medical supplies
- – Minimum of one person in group with valid wilderness first aid certificate
- – VHF Radio
- – Personal Location beacon.
- – Floating rope tow line (kayak tow line) & Spare rope.
- – Clothing suitable for on and off water during journey
- – Food rations sufficient for the journeys totality.
- – Appropriate camp equipment
- -Paddle float
- -Pump
- -Spare Paddles
- – Batteries for ALL electronics.
9. Date of inspection signed off by naval captain
10 – 12: Acceptance of conditions- understanding that responsibility for your safety and wellbeing is your own and only in the event of emergency should the navy be contacted for help. Also second confirmation that you will not travel by night at any time.
13: Statement on how to reach navy via VHF radio: Listening out on Channel 16 (156,800Mhz and frequency 4146.0Khz) when boats are in vicinity. These channels can then be used to communicate a private channel to co-ordinate assistance.
14. Agreement to inform captain of any changes of camps, routes or timings.
Including numbers for relevant emergencies.
- 56-32-2208638 (MRCC Chile)
- 56-61-2201100 (MRCC Punta Arenas)
- 56-61-2201164 (Captain of Puerto Eden)
- Email: DirectMar :MRCCCHILE@DIRECTMAR.CL
- Email: P.Arenas :MRCCPUNTAARENAS@DIRECTMAR.CL
- Email: P.Eden :ORERCPEDE@DIRECTMAR.CL
15. Signed stamp of authorised approval. You are good to go!
B U Y I N G F L A R E S
For obvious reasons, you can not fly with pyrotechnic flares. In Chile buying them has been deliberately made harder due to a historical popularity as a projectile during football matches.
There is a local chain of all purpose hardware stores called Afgal, these are where you can buy flares which in Spanish are Bengalas, this is also the same shop that sells nautical charts. Both of which need to be ordered well ahead of the expedition starting.
To buy flares you pay upfront over the counter and are given a receipt and a form. This you must fill in with intention of use, then have it signed by a responsible second party- for I, it was my boss and friend at Tutravesia kayaking. Once signed you then need to bring this receipt to the local Police station, they will ask the same questions on the form, and if satisfied will sign it as accepted. Then you need to return to Afgal and place the order. It may take several days for them arrive…This is a faster process in Punta Arenas than Puerto Natales.
W E A T H E R A N D T I D E S
It was our deliberate choice to choose an expedition toward the end of the summer period. Although this offers less daylight hours and is colder, it affords a greater chance of the calmer conditions often found fringing the cooler winter months. While winter itself is the calmest, the fjords can freeze over.
Wind speed was the greatest limiting factor to our speed and success and so took highest priority over other climatic factors.
The central Patagonian average shows a 65-70% prevalence to wind from the west with a tendency to funnel north to south along the fjords during autumn and winter months. Trends show the strongest winds range from September to January with Spring and summer months showing the greatest overall averages (Pareuelo.J Et al, 1998, p90). It was our intention to embark in Autumn, where winds are consistently less but before temperatures risk the sea freezing in the fjords. We also chose a north south direction to make best use of these prevailing winds.
Average Seasonal Wind given on a Beaufort Scale across a calendar year.

Pareuelo.J, Beltran.A, Estenban.J, Osvaldo.E.S, Rodolfo.A.G (1998). The climate of Patagonia: general patterns and controls on biotic processes. Asociacion Agentina de Ecologia. Ecologia Austral 8:85-10 http://en.agro.uba.ar/users/sala/pdfs/076-paruelo.pdf
Our weather forecasting was done using the Delorme (now Garmin) 2 way GPS transponder, these however are limited to 140 character texts. My father, based in Scotland would use WindGuru the most reliable source of wind forecasting in Patagonia as his modelling system. From here we coded out a 5 day forecast in the following format. Each day would start with the previous date as a control factor to test the accuracy of the forecast to what it was on the ground.
Date > weather > wind (morning) > wind gust (morning) > wind (mid-day)/wind gust (mid-day) > wind (late) > wind gust (late) > date . . . and so on.
Weather was coded into the following- only one letter was given per day and averaged to the predominant condition expected.
Snow = X Rain = R Sun = S Cloud/Mix = C
So. . . for example. A forecast for the 1st day of the month with snow and morning wind at 10knots gusting 15, afternoon 20knots gusting 35 and evening 5knots gusting 10 would read as such. . .
01X101520350510/
Progressing next to day to to read in succession with A forecast for the 2st day of the month with Sun and morning wind at 5knots gusting 8, afternoon 10knots gusting 25 and evening 12knots gusting 15 would read as such. . .
01X101520350510/02S050810251215…
This would continue for the full five day forecast and was my fathers daily response to our location at camp ‘all ok’ texts.
T I D E S
The average range in the Patagonian fjords is approximately 60cm. Tides are for the most part not a great concern however do speed up in constrictions and around headlands. There is little information available apart from a few select tidal height buoys which can be seen live on the South America Navionics Application. This is where you get to use your paddlers instinct to predict the tides…look for big bodies of water held back by narrows. There is a good one at the head of Peel Fjord, and another leaving the eastern end of both channels east of the Canal De Los Montanes.
We found great difficult reading the tides from the water, often the hugely deep fjord systems seemingly driving their own patterns apparently independent of each other at times. This could perhaps be due to the cold currents flowing out of glaciers, fresh water and saline water cycling about or the sheer depth- I don’t really know. They do not follow the usual 6 hours in and out, occasionally tide will rise while the fjord flows out and drop while the fjord has a current filling it up.
The only big risk was at Peel Fjord where the significant tide (well in excess of 6 knots) pushes enormous chunks of ice out with it in a massive iceberg blender. Getting trapped in this is serious. There is a small channel to the eastern side of the inlet which you can sneak up against and miss the worst of the eddies.
In short, it’s all a little mad- but the navionic app did at least give us a vague idea. Use your instinct as an experienced paddler, be conservative with your decision making and you should be fine.
B U D G E T
Flights from London to south America cost approximately £700 if booked in advance. To add a secondary hold baggage the price varies but is approximately £120 per extra bag.
As an employee of a local Patagonian kayak company (Tutravesia) I was fortunate and grateful to have access to sea kayaks free of charge. However other expeditions I am aware of, have pursued other means: 1. Ship – 2. Rent -3.Buy/Sell
Shipping a kayak to South America costs almost as much as buying a kayak outright. It is slow and if fibreglass has in the past resulted in damage.
Renting a kayak for personal expeditions is becoming increasingly difficult. There are numerous kayak companies in Puerto Natales, however due to the severe nature of the conditions and sheer remoteness of the fjords they are very reluctant to rent without a guide. If you are willing to pay for a guide, then anything is in theory, possible.
Buy/Sell. More commonly pursued, some expeditions offer to buy a kayak outright from a company, then sell it back once the trip is complete. This is a reasonably pursuable option.
Park entry fees were cheap and approximately £5-25, depending on which park you enter.
Food and gas combined cost approximately 400 pounds between two of us. This was significantly reduced by donation of a large quantity of past sell by date freeze dried food sachets.
Flares to provision two team members cost approximately £60.
Overall we both budgeted about £1500 for this expedition- this included purchasing new equipment needed such as VHF radios and GPS units to complete our journey.
S A F E T Y
There are many risks of kayaking and portaging, more so around ice and all of which made more consequential by a remote setting. The potential risks posed are endless, however our greatest concerns came down to the following list which were managed through our emergency plan.
- Wind & Sea conditions
- Hypothermia
- Injury through moving heavy objects on difficult terrain (portage).
- Likely potential on water injuries (dislocations, sprains, strains).
- Likely potential off water injuries (slips, trips, burns, etc).
- Danger from Icefall (Stay away from calving glacial faces).
E M E R G E N C Y P R O C E D U R E S
The following was our official safety procedure as used on our journey.
The proposed journey is by its nature remote and demanding; should an incident occur requiring assistance the necessary emergency procedures are well considered. Each member of the team will carry an emergency contact beacon in the form of a group Satellite phone and two backup personal locator beacons (Spot2 & Delorme).
Position will be indicated using Lat/Long grid coordinated read from charts. Additional position location can be made using both Spot2 and Delorme emergency beacons. It is to our awareness that the Spot2 beacon can be unreliable in certain areas therefore a Delorme will be included for added security.
VHF Radio Frequencies-
http://www.yakexpediciones.cl/eng/IN-Frecuencias.asp
Rescue Logistics:
- Self Rescue
Along the route of the Navimag ferry contact can be established via VHF radio, Sattelite phone or in extreme case the deployment of emergency flares to alert the captain. The ferry will cross through the main shipping lane that transects the fjords once every seven days on a Wednesday toward Puerto Eden, and a Tuesday toward Puerto Natales.
The presence of local fishing boats and remote fish farms (once nearing Puerto Natales) are a secondary option for emergency contact. Although seldom.
- Assisted Rescue: Naval assistance
Rescue equipment:
Each member of the team must be competent paddlers familiar with the conditions of extreme wind (up to and exceeding 40knots) and waves expected to a maximum of 3m. Each member of the party should be trained and well practiced with various self and team rescue techniques for a variety of potential scenarios in these extreme conditions.
As a team, emergency parachute flares and L.E.D hand flares will be carried to alert assistance. Each member should carry a pump, spare paddles and paddle float onboard their kayak with an addition of a minor injuries medical kit, emergency heat-blanket and warm layer in a ‘ditch kit’- should a worst case scenario result in complete separation from their kayak and team. All members should be trained and familiar with the use of all of the above. *See Equipment list.
Self Assisted Contingency Plan:
Should climatic conditions force extended shore stay and make the original route unattainable with existing rations then the following ‘second plan A’ should be implemented.
- Removing detour options to glaciers: As part of the journey it was our intention to detour north at three points in our route to the following: Pio XI, Peel Fjord and Canal De Los Montanes regions. Should weather slow route times these could be forfeited in favour of a shorter more direct route in order to award extra time to reach our final destination.
- Beyond 40 days implement a reduced diet rationing to prolong sustained travel. Calorific intake will be reduced from 4500Kcal to 3000 Per day.
- Bail. – For the first 400km the escape point is Puerto Eden, this can be reduced to 300km by eliminating detours. For the remaining 400km the escape point is west of Puerto Natales at the fish farms at Bahia Talcahuano. It is preferable to continue south as prevailing wind will assist.
All timings and rations were based on the following calculations:
- Estimated average speed 25km per day. – allowing ‘catch ups to be made on longer days’
- Timing for journey to last based on distance covered:
- 20km = 39 days
- 25km = 31 days
- 30km = 26 days
- Estimate + 10% for weather days.
Our real time average was- 38km per day.
M E D I C A L & R E P A I R
Emergency Kayak Repair
The following items will be carried between the team in the event of failure of kayak equipment.
| Item | Quantity | Function |
| Duct-Tape | 3 | Repairing Literally everything |
| 2 part Putty | 4 | Fast acting hole repair |
| Surf wax | 1 | Fast acting hole repair (at sea) |
| Denso Tape | 2 | Temporary leak repair |
| Flash Band | 2 | Temporary leak repair |
| Allen Key | 3 | Tightening Bolts/adjustments |
| Mini-Blowtorch | 1 | Plastic welding cracks / holes |
| Lighter | 1 | Lighting blow-torch / drying repair area |
| Hatch Cover Front | 1 | Emergency hatch replacement |
| Hatch Cover Rear | 1 | Emergency hatch replacement |
| Spare Deck | 1 | Emergency deck replacement |
| Mini Caribiners | 10 | Tie downs and skeg fix. |
| Wire Cable | 3 | Repairing Skeg (drop down keel) |
*In hindsight the only emergency repair needed was a broken skeg unit- ironically the one part which we did not have. Improvisation prevailed, however I would recommend one if going through iceberg filled areas – my skeg was up at the time of incident however snatched down on an iceberg and snapped.
The medical kit carried contained provisions to treat as many possible incidents as we could imagine. With exception to Zinc tape – used to treat blistered hands, little gear was used- an ideal outcome.
- Latex Free Rubber Gloves
- Breaks (Δ bandages, ACE wraps x2, trauma kit, cloxlina clot sponges, SAM Splint).
- Cuts (see above) + Additional Dressings, Butterfly stitches, sewing kit, duct tape.
- Anti-Bacterials & Anti Parasite tablets and creams (Flucloxacillin & Vermox)
- Burn treatment (Burn ointment & Cling film)
- Tough Cut Scissors
- Anti-Diarrhoea, Laxatives, Painkillers (Codeine), Aspirin,
- Epi-Pen
- Dental repair cement
- Zinc Oxide climbers tape
M O I S T U R E M A N A G E M E N T
One of our biggest concerns on this trip is dealing with moisture. The western fjords are unbelievably wet. For this we set a rigid rule of no wet gear to enter the internal section of the tent, which was also separated from the wet outer tent and stored dry. We had a dedicated wet and dry set of clothes, one for inside, one for out.
All sleeping bags should be either hydro-down or synthetic.
MENTAL HEALTH
Each night we applied a 1-10 rating scale on our self-perceived enjoyment of the day. This allowed both self reflection on each days progress but also a visual cue to mental lows. A day below 6/10 was perceived as bad, if this lasted more than 3 days then a discussion was made on what the possible issue was, and where appropriate a change in routine given.
We split ourselves into ‘wet’ and ‘dry’ tasks on a two day rota. ‘Wet task’ was to set the anchors of the tent, collecting water and outside jobs, while ‘dry task’ could dive inside and begin setting sleep gear/food. This gave something to look forward to during extended wet periods and reduced arguments of task delegation.
Seumas and I were already very firm friends, we knew and trusted each other and could read each others emotions well. This gave us the ability to lift the other when needed, or to give space to the other when that was needed. A good team is a team who can do this.
Throughout the three months we had less than a hand full of arguments, none major, most due to being tired or hungry and all quickly resolved without issue.
G E A R
D R Y S I D E
- Tent – Hilleberg Allak
- Tarp – Hilleberg 10UL
- Sleeping Mat- Thermarest Neo-Air
- Sleeping Bag- Rab Neutrino 800 *Hydrodown
- Head-Torch – LEDLenser H7
- Primus Omni-fuel stove *Burning canister 70/30 mix propane butane gas
- Kitchen Utensils (Primus 2L pot, Bodum coffee press mug, long spoons, knife)
- MSR Dromedary
- Iridium Satellite Phone
- Delorme 2-was communicator
- Garmin Oregon GPS (hardly used)
- Batteries *LOTS of them*
- Powertraveller – Powergorilla charging station
- Medical Kit
- Kayak repair kit
- Camera Gear (Canon 5DMKII, 24-105mm lens, 70-300mm lens, Gitzo tripod, GoPro hero4+, 6x 32GB CF cards, batteries)
Although optional extras, the Dromedary and the Tarp were extremely useful on this journey.
W E T S I D E
- Kayak- P&H Scorpio MK1 MV
- Paddles- Werner Ikelos
- Spare Paddles- Werner Skagit
- Pump – Palm Kayak Pump
- Paddle Float
- Sponge
- Kokatat Expedition Drysuit
- Kokatat Maximus Centurian PFD
- SOLAS ACR Firefly strobe light (PFD mounted)
- Short tow clip (Contact tow)
- Tow line – Northwater Pro-tether.
- Nautical Charts (printed via a building planning agency)
- Chart case
- Standard Horizon HX870 DSC VHF Radio
- Ditch Kit (Mini medical-kit, blizzard bag emergency shelter, warm layer)
- Flares – Odeo LED hand flare, 1x Rocket, 2x Smoke
- Safety Knife
- Pogues & Neoprene gloves
C L O T H I N G
- 2x merino underwear
- 3x thick woollen socks
- 2x Thermal Leggings
- 1x Rab Merino T-Shirt
- 1x Dhu Cashmere base-layer (Light)
- 2x Dhu Cashmere base-layer (mid)
- 1x Rab Microlight jacket
- 1x Rab Photon X jacket
- 1x Rab Torque Trousers
- 1x Rab Latok Jacket
- 1x Rab Polartech Balaclava
- 1x Dhu Dome Cashmere Beanie
- 1x Scottish tweed flat cap (perfect paddle hat).
- Gloves & Liner Gloves
Packing dimensions as drawn when stormbound in expedition diary-

D I E T
Our diet was based on a daily calorie expenditure of 4500KCal per day.
According to the American Council on Exercise, a 125-lb (60kg). person burns 283 calories per hour of kayaking while a 150-lb (70kg) person burns 340, a 175-lb (80kg) person burns 397 calories and a 200-lb (90kg) person burns 454 calories/hour.
For the purposes of our expedition we chose to base our calorie output at 400Calories per hour and calculated a daily paddle time of 6 hours. This resulted in a total of 2400Kcal burned per day with an additional 2100Calories used for bodily function/heat exchange.
Although many days we paddled considerably longer than 6 hours, this spread over an average would maintain a stable weight. In addition to this, every third day an extra dinner ration was portioned to give a boost, both energetically but also mentally.
Food rations were based on a balance of energy output, fibre content and vitamins, with higher protein foods during the day and more carbohydrate based foods morning and evening. Fat content was boosted to give calorific supplement in the form of ‘a shit tonne of butter’ (about a 500g block a day between two of us). Food during the day was eaten on the principle of little and often.
Water sources are in no shortage what so ever, it is pure and clean.
Breakfast
-100g oatmeal- 100g mixed nuts/fruit – 50g fibre bran – 20g chocolate whey protein – 3x mango slices 5x fresh dates – 1x vitamin pill. 100g butter. Fresh black coffee.
11am snack – Chocolate bar – mostly snickers bars, sometimes High5 ‘race bars’
Lunch – 150g cheese – handful of trail mix (mixed nuts and fruit).
3pm snack – Chocolate bar – mostly snickers bars, sometimes High5 ‘race bars’
Dinner – 800Kcal Expedition food sachet (mixed brands, all out of date and donated)- supplemented every third night with a 450Kcal additional ‘side portion’ – normally mash and gravy. Toward end of trip this was swapped to a second 800Kcal dinner. Tea
Each meal supplemented with a further 150g of butter.
Supplements
Water bottles containing 100Kcal High5 energy powder
Half way ‘victory chocolate bar’
Miniature 100ml bottle of whisky (to be drunk before death on final day).
T O P T I P S A N D H A N D Y H I N T S
-Tides: There is little information on tides in the fjords. A few seldom tidal buoys can be found on the nautical app Navionics, however only give high and low times. Tidal flows in the fjords can be extremely confusing, often rising as the fjord empties and visa versa- from what we could tell this is due to the extreme depth of the water and temperature gradients forcing cyclical tidal flows. The average tidal range between Puerto Natales and Puerto Eden is approximately 60cm on springs.
–Conditions: One saving grace of the fjords is their narrow channels and regular bends. This seems to reduce overall fetch on the waves and reduces any effect of ocean swell. During the strongest winds we experienced (in excess of 40knots) the wave height crested approximately 2-2.5m although very steep. Weather conditions are notoriously unpredictable and wind may appear with frightening immediateness and lack of warning.
–Watch the clouds: Before committing to open crossings across fjords, we chose to drift and observe mist and clouds on the hills around us. This gives an excellent gauge on any imminent wind.
–Water: Fresh water is everywhere on the mainland, but can be limited on smaller islands. The water can be drunk without filtration or boiling, although if in doubt this is still recommended.
–Climate: If you are going on a 30 day expedition, prepare for 30 days of non-stop rain, anything otherwise is a bonus. One area in the fjords once held a record 9m of rain in a month!
-DO NOT EAT THE SHELLFISH! – This is extremely important. During certain periods invisible algal blooms can contaminate the shellfish, without proper testing this can cause serious harm resulting in worst case scenario failure of internal organs and ultimately death. Just don’t eat them!
– Emergency PLB- It is worth knowing the the SPOT brand of personal locator beacons are unreliable in Patagonia, this is due to the satellites they use. Garmin Delorme or McMurdo Fastfind are better.
–Check the Gas Cans! – This is a bit of a funny one, but we discovered in Chile a good portion of the GoLite camping gas canisters false advertise their contents. A considerable number of the recommended ‘winter mix’ *70/30* propane butane mix cans actually contain 50/50 if you check the ingredients, while their label says 70/30. Don’t trust the large printing on the cans, read the small print on them instead.
I F T H I S H A S H E L P E D Y O U M A K E Y O U T R I P H A P P E N I ‘D L O V E T O H E A R A B O U T I T Drop me a message on Twitter, Instagram, Facebook or Email
Finally a massive shoutout to all those below who supported our expedition and my future expeditions to come with superb equipment.


Thanks for this great article, its all gold. We are currently thinking about a similar trip, this is definately very usefull! All the best, Rob
Hi Rob,
Many thanks. Im actually in the process of planning the final leg of our Patagonian expeditions to Cape Horn this year too.
Drop me an email any time I can help in any way- Im in Patagonia until May.
Also check out into the sea expeditions on facebook- they are doing a huge journey here right now.
Cheers
Will
Hi Will, thanks for the reply. We have finally decided to push this trip back for the time being, I’m still motivated to do it one day, so I will hang on to your contact. Good luck with your preparations and happy paddling!
Best regards,
Rob